Shape Specifications
COLLADA and DTS
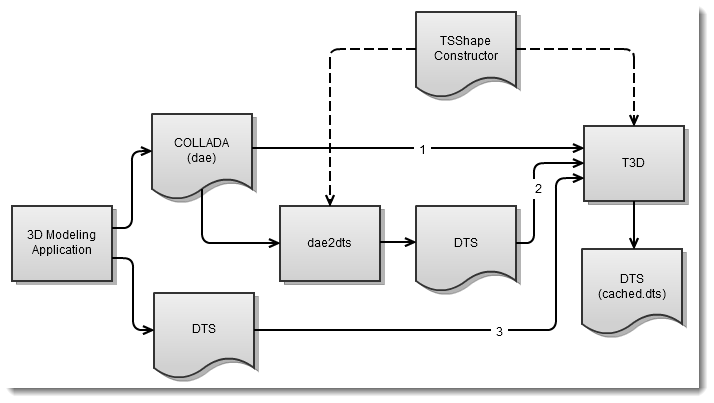
Torque supports two different formats for 3D geometry and animation data: COLLADA (model.dae) and DTS (model.dts). The two formats have different strengths and most teams will find an appropriate mix of both to be the best practice. Models in either format can be further customized after loading into Torque using TSShapeConstructor (see the TorqueScript reference documentation for more details). This TorqueScript accessible class allows nodes, sequences and detail levels to be examined and modified at runtime. Common uses are to define and split animation sequences embedded within a COLLADA file, and to share animations between characters with the same skeleton.
It should be noted that all changes applied by a TSShapeConstructor script occur to the in-memory model; nothing is cached to disk, so the transformations will occur every time the shape is loaded by Torque. In some cases therefore it may make sense to 'bake' transformations by using the dae2dts tool as part of a custom import/export pipeline or release packaging script.
COLLADA is intended to be the primary model format during development of a Torque game; there are COLLADA importers and exporters for almost every 3D modeling application around, and in a pinch you can even edit the XML dae file manually - handy if a programmer or level designer needs to test a minor tweak without bothering the artists.
DTS is generally the model format of choice when releasing a game. It is an optimized, binary format that loads much faster than COLLADA, and also provides a small measure of protection for art assets (most applications can import DAE, but very few can import DTS). The normal workflow is to use COLLADA during development, then make sure all models are converted to DTS for release.
There are several different approaches available to achieve this:

1. Use the autogenerated cached.dts files
When Torque imports a COLLADA model it saves the resulting 3-space shape to a DTS file in the same folder as the DAE (model.cached.dts). The next time the DAE file would be loaded, Torque first checks if there is a newer cached.dts file in the same folder and if so, loads that instead. For simple models, this means you can simply strip the DAEs from the released version of the game, leaving only the cached.dts files. All datablocks and mission files still refer to the DAE model, but Torque will automatically load the cached.dts in its place.
Note that the cached.dts file represents the converted DAE model only - changes applied using a TSShapeConstructor script are only made to the in-memory shape, so are not included in this file.
2. Use the dae2dts tool
The dae2dts tool can be used to convert COLLADA files to DTS as needed. If using this approach, datablocks and mission files should refer to the coverted DTS output file, not the original DAE file. The dae2dts tool bakes any model transformations made using TSShapeConstructor into the final DTS model, so make sure that the TSShapeConstructor script used with dae2dts is not run when loading the DTS output file into T3D (by making the filenames different, or keeping the output DTS file in a different folder) or the changes will be applied twice!
Of course, there is no reason you could not use one TSShapeConstructor script with dae2dts to bake changes, then use another TSShapeConstructor script when loading the baked DTS file into T3D to apply dynamic changes (like auto-loading all sequence files within a folder for example).
3. Export directly to DTS
If using a modeling program with DTS export support, it may make sense to export certain models directly to DTS; although current DTS exporters have several limitations (single UV set, no vertex colors, limited to around 11000 triangles per mesh) compared to COLLADA.
Level-of-Detail (LOD)
LOD is an extremely important concept to master in order to produce a great looking game that plays smoothly on low/mid-range hardware. Essentially, it involves rendering successively less complex versions of a shape in order to improve performance. The metric used in Torque to control LOD is the estimated size of the shape on screen; as the shape gets further from the camera it will become smaller on screen, and a simpler version of the mesh may be rendered without loss of fidelity.

A Torque 3D shape (sometimes called a 3space or more commonly DTS shape) consists of the following elements:
node
A node is a place-holder for transform (position and rotation) information. Nodes are arranged in a parent/child hierarchy allowing complex skeleton structures to be built up.
sequence
A sequence is a set of key-framed node transforms and object states (e.g,. visibility).
mesh
A mesh is a piece of triangulated geometry, and may be a normal mesh or a skin (vertex weighted mesh). Each mesh is associated with an object and a detail level.
object
An object is a set of meshes, each at a different detail level. Each object is attached to a single node, and is rendered at that node's current transform. Note: the transform may or may not be animated. When the object is rendered, only the mesh associated with the active detail level will be rendered. Objects do not need to define a mesh at every detail level. For example, some parts of a shape could be made visible only when near to the camera.
detail
A detail level is a set of meshes (one from each object) that will be rendered when the detail level is active.
With those definitions in mind, a 3space shape can be visualized in a hierarchy as follows:
Or in table form as:
Torso
Head
Armor
ColBox
256
Torso256
Head256
Armor256
64
Torso64
Head64
Armor64
32
Torso32
Head32
-1
ColBox-1
The shape contains 4 objects (Torso, Head, Armor, ColBox), each of which have one or more meshes at different detail levels. Before rendering the shape, Torque estimates how large it would appear on-screen, and determines the appropriate detail level to render. Only the meshes in that detail level (a 'row' in the table above) are rendered. The estimated size is based on the shape's bounds, the camera distance and Field-of-View (FOV). The following table shows how the shape will be rendered as it moves further from the camera:
>= 256
0 (size=256)
Torso256, Head256, Armor256
>= 64 and < 256
1 (size=64)
Torso64, Head64, Armor64
>= 32 and < 64
2 (size=32)
Torso32, Head32
< 32
none
none
Note that detail levels with negative sizes will never be chosen for rendering. Once the estimated size is less than the smallest positive detail size, no geometry will be rendered for the shape. You can force a shape to always render something by making the smallest positive detail level have size=0. Negative detail level sizes are used to store non-rendered geometry such as collision meshes. In the shape above, the ColBox object defines a single mesh to be used for collision detection and will never be rendered due to its detail size of -1.
See also
Bounds
Every 3D shape includes an axis-aligned bounding box. This box appears around the shape when it is selected in the World Editor, and can be used for simple collision detection or mouse-hit picking. The bounding box is also used to determine which shape detail level to render (see LOD). The size of the bounding box is not fixed to the shape geometry. The modeler is free to define a custom bounding box extent for an object. This is normally done prior to DTS/DAE export by creating a cube mesh called "bounds" with the appropriate dimensions.
See also
Collision Geometry
Collision geometry is a special minimal version of the shape which is used in the game engine's collision system. In general, if there are fewer polygons in a collision volume then the collision detection will be faster. Collision geometry is stored in a shape within one or more detail levels with negative size values (indicating that the detail level is not to be rendered). Collision detail levels must be named Collision-X or LOS-X for collision or line-of-sight (raycast) collision respectively. LOS collision meshes are only used in raycast tests for things like projectile collision. X is a number from 1 to 8 for collision meshes, or 9 to 16 for LOS collision meshes. If your modeling application does not support hyphens in names, use an underscore instead (e.g. Collision_1).
The name of the collision mesh for a given detail level can give a hint to the Torque engine about what type of geometry to use. This allows for significant performance improvement in the case of the box, sphere and capsule primitives, or for non-convex geometry to be used for collision detection. Any mesh that does not match one of the names below will be interpreted as a generic convex hull (i.e. the same as ColConvex). In this case, the vertices of the mesh are used to construct a convex hull when the shape is loaded.
ColBoxThis will be converted to a box primitive (that bounds the mesh) when the shape is loaded.ColSphereThis will be converted to a true sphere primitive (that bounds the mesh) when the shape is loaded.ColCapsuleThis will be converted to a true capsule primitive (that bounds the mesh) when the shape is loaded.ColConvexA generic convex mesh, converted to a true convex hull when the shape is loaded.ColMeshA generic triangular mesh that does not need to be convex. This type of geometry is the most expensive for collision testing, and should be kept as simple (fewest triangles) as possible.
Prior to export, you should add the size of the particular detail level to the mesh names above. When Torque 3D encounters one of the primitive mesh types (Box, Sphere, Capsule), it uses the mesh bounding box to quickly calculate the dimensions (length, radius etc) of the box, sphere, or capsule. For this reason, the mesh should be aligned to the local coordinates of the node that instantiates it as shown below. This ensures the axis-aligned bounding box is a tight fit and that the calculated primitive dimensions are accurate.

See also
Billboards
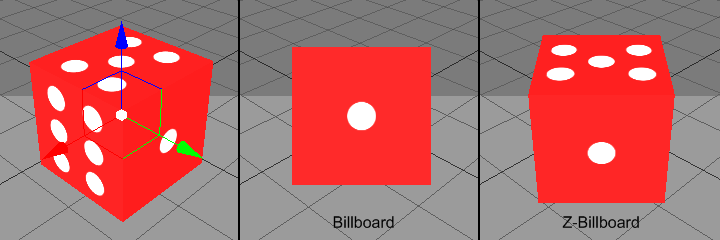
A 3D mesh may be marked as a billboard before export to DTS/DAE, or directly in the Torque 3D Shape Editor. When a billboard mesh is rendered, it is rotated such that it always faces the camera (technically, the rotation is such that the mesh forward (+Y) axis points out of the screen). A shape may contain a mix of billboard and non-billboard meshes. For example, you could have an explosion shape in which shrapnel flies out from the center and also have little explosion balls fly out that are just flat polygons that always face you. A second type of billboard is the Z billboard, which rotates the mesh to face the camera only around the Z (up) axis as shown below:

The billboard mesh's center of rotation is the position of the node to which that mesh is attached. For example, a tree model might have multiple branches set up as billboards, all attached to different nodes such that each branch is rotated around its own node, rather than the center of the tree.
The exact details of how to export billboards to a DTS shape will depend on the modeling package, but in general it is done by prefixing the name of the mesh with BB:: (or BB_ if the modeling app does not support colons in names) for a normal billboard, or BBZ:: (or BBZ_) for Z billboards.
See also
Imposters
Imposters (also known as AutoBillboards) are commonly used as the last visible detail level for when the model is far away from the camera. These detail levels are special in that Torque generates a series of low-resolution snapshots (both diffuse and normal maps) of the model at different camera angles and stores these in two DDS files in the same folder as the model. When the imposter detail level is active, Torque selects one of these snapshots to render instead of the 3D geometry. With appropriate settings, this can give a significant performance increase with negligible loss in visual quality. As the camera moves around the shape, the Torque engine displays the appropriate snapshot. Imposters are often used as the smallest detail level since they are very efficient to render being composed of only two triangles.
Imposters may be configured using the following settings (note: polar billboards are the two billboards that face straight up and straight down, i.e. the ones at the poles):
BB::DL
integer
Index of the detail level used to generate the snapshots (usually 0).
=0 samples the highest LOD
=1 samples the second-highest LOD
=2 samples the third-highest LOD
BB::DIM
integer
Size (width and height) of each snapshot in pixels. Use powers of 2 such as 32, 64, 128 etc.
BB::EQUATOR_STEPS
integer
Number of snapshots around the horizontal axis of the model.
BB::POLAR_STEPS
integer
Number of longitudinal steps between the polar billboards. Polar steps do not include or calculate imposters created for the top or bottom of the shape, only the billboards in between. The numbering of this setting may seem counterintiutive, but here's how it works:
A setting of 0 will give 1 polar step between the polar billboards
A setting of 1 will give 3 polar steps between the polar billboards
A setting of 2 will give 5 polar steps between the polar billboards
A setting of 3 will give 7 polar steps between the polar billboards
A setting of 4 will give 9 polar steps between the polar billboards
BB::INCLUDE_POLES
boolean
Flag indicating whether to generate snapshots of the poles (top and bottom) of the model. When this is off the BB::POLAR_ANGLE setting is irrelevant.
BB::POLAR_ANGLE
float
Angle (in degrees) from the equator that acts as the threshold between the polar billboards and the rest of the billboards.
When Torque loads a shape with an imposter detail level, it automatically generates the files that contain the billboard images. The files are titled shapename.imposter.dds and shapename.imposter_normals.dds.
Carefully select step settings to optimize your imposters to boost quality and reduce use of disk space. For example, BB::EQUATOR_STEPS=5 and BB::POLAR_STEPS=2 with no polar billboards will give 25 imposters. Each being 256x256, that will result in two imposter files (one for diffuse/transparency maps, and one for normal map) that are 1024x2048:


In fact, there is a lot of unused white space at the bottom of these textures. You could increase BB::EQUATOR_STEP to 6 adding five more billboards without increasing the overall imposter texture size. Thats a fifth more imposter textures at almost no cost. Also, make sure your bounding box is as tight on your shape as possible to reduce the whitespace between billboards and maximize the resolution of each billboard with their size limits (256x256 in the example above).
With proper settings your meshes will automatically billboard in-game.

See also
Last updated