Material Editor
Material Editor
Torque 3D’s Material Editor allows an artist to quickly create and edit a game object’s materials without ever touching a line of code. This tool can preview and edit materials mapped to an object in real time from the World Editor. Materials are categorized for ease of organization, and the editor is designed to be backwards-compatible with any existing script files. Materials are defined within script files named materials.cs
The Material Editor quickly comes into play when you are building your level by placing objects into the scene. As an example situation, let us assume you have a light fixture you or another artist has exported for use in Torque 3D. The creation of this object was a multi-step process.
The object’s geometry had to be created in a 3D modeling app, such as 3DS Max, Maya or Blender. Once the geometry was finished, a 2D graphical application was used to create the various textures that make up the high quality appearance: base texture (diffuse map), normal map, detail map, etc.
The rendered view of this object looks fine in the originating application, which leads you to believe it is ready to be imported into your game’s level. When you drop the lighting fixture into the world, there is a good chance it will fit right in based on your existing design. The theme and color scheme are likely a match.
However, once your object is in the level you might notice something is off. While the stand alone object viewed in an external tool looked great, the object now seems out of sync with your level’s lighting, tone, or specific room theme.
This is not the fault of the artist or design. What has happened is the materials for your object have either not been assigned or need to be tweaked to perfection in specific instances. Instead of going back into the art tool or adjusting properties in code, you can use the Material Editor to edit the appearance of your object by adjusting the texture maps and their properties.
Interface
To switch to the Material Editor press the F4 key or from the main menu select Editors -> Material Editor.
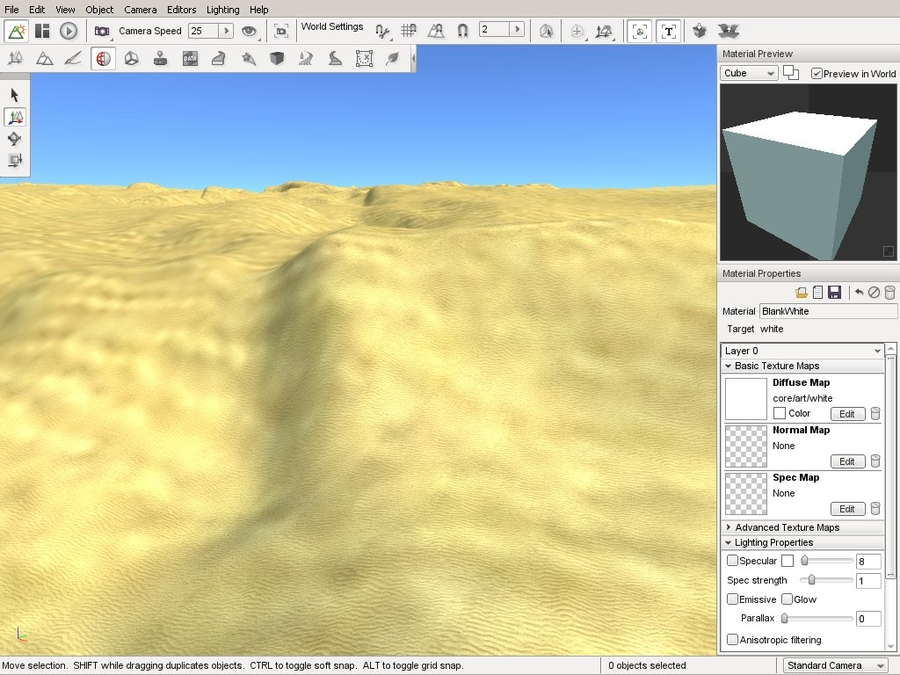
Main Editor
Each major section of the Material Editor is separated via a header, such as Lighting Properties or Animation Properties. The fields found in these sections directly manipulate a materials properties in real time.
Material Preview
CubeChanges the Preview Mesh.Square SymbolsChange Normal Light Color.Preview in WorldShow changes made in material editor on selected object in scene view.Bottom RightClick square to change color of background preview.
Material Properties
Edit MaterialSelect and Edit an Existing Material (E).Floppy DiskSave material.Trash CanDelete Material.Name.dtsName of 3D asset using this material.First Drop DownTexture associated with material.MaterialName of material.Square with BallSwap current material mapped to this mesh for another.2nd Trash IconRemove this material from mesh target.
Basic Texture Maps
Diffuse MapBase texture for material.Normal MapBump map that provides higher detail to mesh without extra polygons.Overly MapTexture draw on top of other maps.Detail MapTexture providing additional detail via lightening and darkening base map using high pass filter.Light MapTexture using baked lighting info.Tone MapMap which scales the RGB values of material. Used to calculate HDR.
Advanced Texture Maps
Diffuse MapBase texture for material.Normal MapBump map that provides higher detail to mesh without extra polygons.Overly MapTexture draw on top of other maps.Detail MapTexture providing additional detail via lightening and darkening base map using high pass filter.Light MapTexture using baked lighting info.Tone MapMap which scales the RGB values of material. Used to calculate HDR.
Lighting Properties
SpecularEnables the use of Pixel Specular (shininess) for this layer. The slider adjust the strengt, and you can set the color of the specularity.GlowDetermines if this layer will Glow or not.ExposureIntensifies glow and emission.EmissiveCauses an object to not be affected by lights. Good for materials from light source objects.
Animation Rotate Properties
PurposeCauses material to rotate along the surfaces of the mesh it is mapped to.U and V SlidersDetermines the direction of U/V coordinate rotation.SpeedRate of coordinate rotation.
Animation Scroll Properties
PurposeCauses material to scroll along the surfaces of the mesh it is mapped to.U and V SlidersDetermines the direction of U/V coordinate scrolling.SpeedRate of coordinate scrolling.
Animation Wave Properties
PurposeCauses the material to scroll in a wavy manner along the surfaces of the mesh it is mapped to.Wave TypeSwitch between sine, triangle, and sqaure wave patterns.AmplitudeChanges the positive and negative crest of the wave (intensity).FrequencyAdjust wave length, which is the number of waves per time interval.
Animation Sequence Properties
PurposeAnimates texture by frames.Frames per SecHow many frames to display per second.FramesNumber of total frames in the sequence.
Advanced Properties
PurposeAdjusts advanced parameters that affects transparency calculations.Transparency BlendingSets material to use transparent blending modes.Transparent Z WriteCan be used to help force a proper Z Ordering when Z Ordering issues occur. Only valid on materials with Transparency.Alpha ThresholdWhen enabled, causes pixels under a specific alpha threshold to get discarded rather than be computed.Cast ShadowsMaterial determines whether target mesh is allowed to cast shadows.Double SidedDetermines if this material will be rendered from both sides of a polygon.Blending BoxDetermines type of blending and reflection applied on the transparent object.
Material Selector
When you wish to swap the material mapped to an object or create a new material, you will use the Material Selector. To change the material on an object, it must first be selected. If you do not know how to select an object, refer to the Object Editor documentation, then switch back to the Material Editor (F4). The Material Properties pane on the right side of the screen displays the properties that describe the material of the selected object.
At the top-right of the pane there is a value named Material. Click on the globe to the right side of it. This will bring up the Material Selector window.
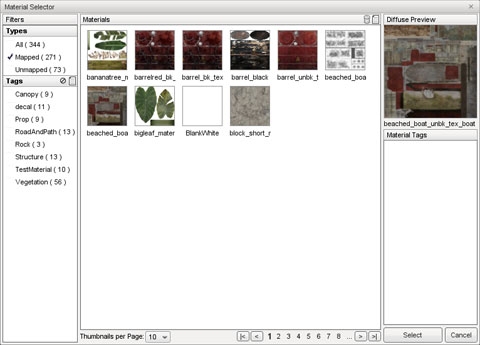
The center section of this dialog displays a list of all materials currently loaded in the game. OClicking on any material selects it which will cause the panes on the right to update and display information about the material. This information is limited to a preview of the material’s Diffuse texture, the name of the diffuse texture, and a list of filter tags.
On the left is a list of filters. The filter system is used to organize your materials for ease of use, and contains types and tags. To create a new tag, click the new tag button:
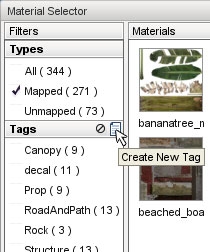
The Create New Tag dialog will pop up. Enter a name for your new the tag then click the Create button. In this example, you will be grouping all the materials related to cliffs. Whenever a material is selected, the Material Tags section on the right will be updated to show all the tags that you have created, each with a checkbox. Clicking the box of a specific tag will associate that tag with the current material. Clicking a checked box will dissociate the tag from the material.
The list of materials can be filtered using the tags assigned to them. To filter the material list use the tags section on the far left. When you click on the check box for tag it tells the system to include materials that have that tag in the list. Any materials that do not have at least one of the checked tags will be filtered out of the list.
Editing an Existing Material
Your game’s levels can potentially contain thousands of different objects with varying purposes: explosive barrels, ammo crates, static light fixtures, solid walls, etc. Each one will have a material that might need subtle tweaking to fit in, such as a glowing light bulb.
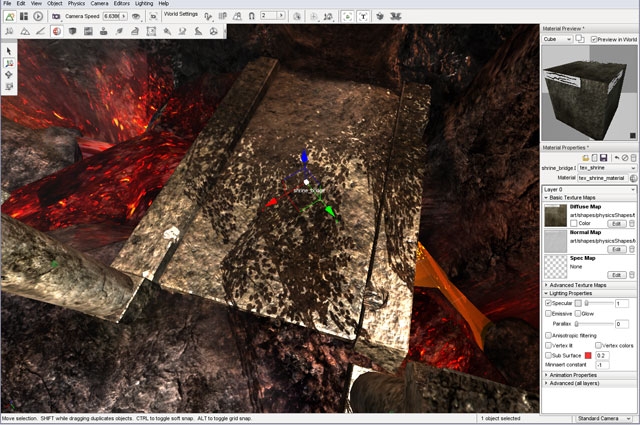
In this example, you will adjust the properties of this bridge materials.
Remember that you can preview the changes in the scene as well as the preview box in the Material Editor. You will start by toggling the Specular property of the material used for the metal pipe. Without Specular enabled, an object will not have a shine and will thus appear flat.
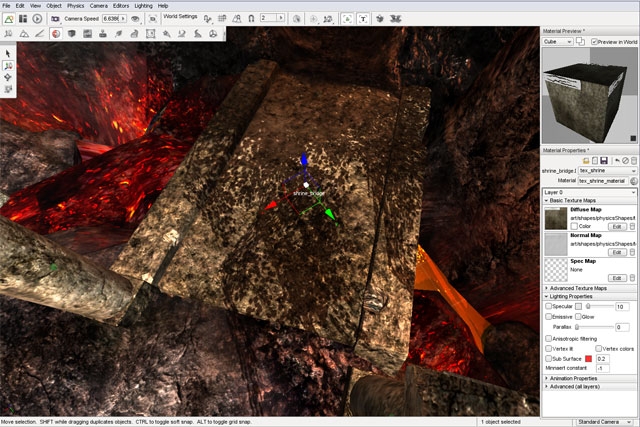
When the Specular property is enabled, the cube in the preview box will have a shiny appearance. In the scene, the metal will also be shinier due to the lighting reflection.
Creating a New Material
While developing your game, you will most likely be using your own assets. When you add a model to the scene, it will be assigned the default “No Material” texture which serves as a warning to the designer that no material has been assigned to an object. This material is automatically used for all assets before they have a mapped materials.
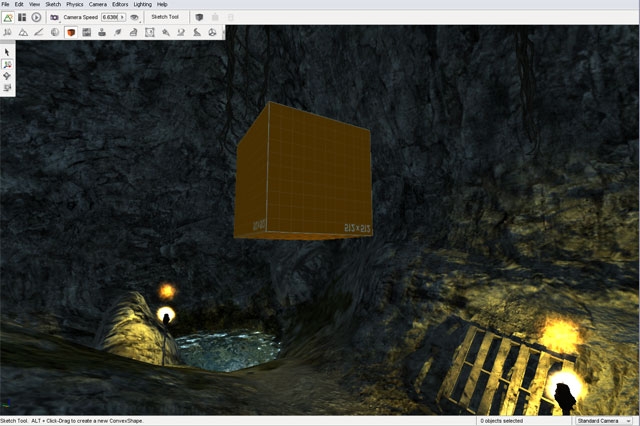
If you have already created the textures for your object, creating and assigning a material is a simple process. Start by clicking the globe symbol next to the Material name box.
The Material Selector dialog will appear. Click the Create New Unmapped Material button found at the top right of the Material section’s header.
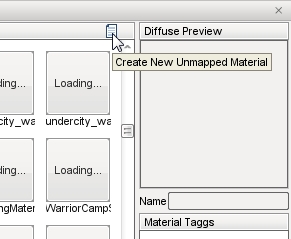
A new material will be added to the list with a name similar to newMaterial_0. Click on the material to view it in the Diffuse Preview section.
Click the Select button to use that selected material for the object you are editing. After the Material Selector closes, you will be prompted to save any material changes that you may have made before entering the Material Selector. Do so if you wish to retain any changes that you made prior to creating the material.
Your new material will have replaced the material selection in the Material Properties pane back in the Material Editor and should now be displayed in the Material field. Type in the real name you want for your new material to be known by then press the Enter key. In this example, the name of the material is “boxxy.”
Before editing anything else, click the Save Material button, represented by the floppy disk symbol to save the new material.
Note
You MUST press the Enter key after typing the material name BEFORE clicking the Save Material button or the material will not be properly saved.
Now, scroll down to the Texture Maps section of the Material Editor. This is where you will be adding the actual texture files that define this new material. Click on the Diffuse Map preview or the Edit button in that section to open a file browser. Navigate to your diffuse texture, or sometimes referred to as the base texture. Select the file that you want to use as for this new material then click the Open button.
Your preview window and scene should immediately be updated to reflect the addition of your texture.
Repeat the process to add your Normal map. Click on the preview or edit button in the Normal Map section. When the file browser appears, select your normal map texture. Once again, your scene will be updated to reflect the changes that have been made to the material. Click the save button to retain these changes.
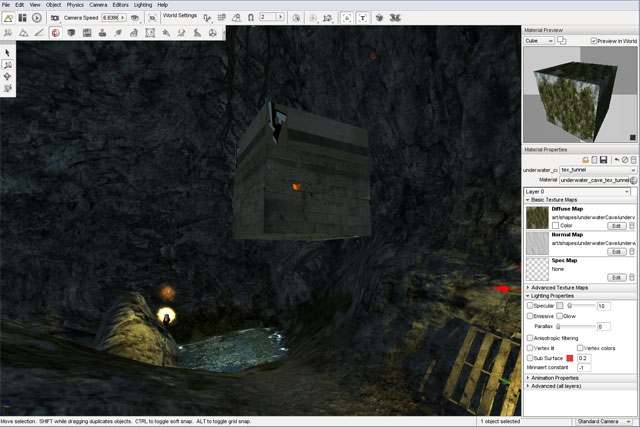
If you open the Material Selector again, you will notice your new material has been saved in the list. This material is now available to be assigned to any other meshes within the project without having to go through the whole process of redefining it again.
Last updated